Sew vintage kimono yourself
Sewing a vintage-style kimono is quick and easy once you understand the amazingly simple cut of the garment. This is the quick and easy way to get a beautiful piece of clothing.
What you need:
- Fabric approx. 3 mx 0.90 m
Cut of the kimono
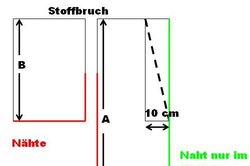
- The pattern parts of the kimono consist exclusively of rectangles. You only need to consider 2 dimensions. The first distance is the distance from the height of your shoulders to the hem of the garment (distance A). The other measurement is the distance from your shoulder to the level of your navel (distance B).
- The front and back are made up of a 2 A rectangle. The width is 30-40 cm, depending on how full you are or how far you want to wear the garment.
- The sleeves are also rectangles, the width is 30-40 cm and the length 2 B. The sleeve will later have width B, i.e. it will extend from the shoulders to the navel.
- Put the two rectangles for the front and back pieces together so that you bend them along the shoulder line. The part is now length A. Mark a point in the fraction that is 10 cm away from the edge that should be in the front center. Mark a point on this edge at a distance B from the shoulder line. Connect the two points. Cut off the triangle.
- Now cut a strip 16 cm wide for the collar. It has to go from your navel around your neck to your navel. Make it a little longer and only shorten it later when sew.
Sewing dirndl dresses for children yourself - tips and ideas for classic dresses
You can sew dirndl dresses surprisingly easily yourself. The cuts are at ...
Sew the garment in a vintage look
- Now connect the two pattern pieces in the back. Then sew the opposite side of the two pattern pieces together. From the shoulder, leave 10 inches of the seam open.
- Place the sleeves right sides together so that a rectangle of height B is created. Now sew up the 30-40 cm long side. Also close part of the seam on the side where the sleeve will be sewn. Leave approx. 25 cm of it open. A kind of bag is created. Turn the sleeves over.
- Now sew on the sleeves in the shoulder area, leaving a piece open at the bottom. So your vintage kimono has a hole under the sleeves.
- Fold the strip for the collar in half. Iron the breakline. Fold one short side one centimeter to the left. Iron this break line as well. Iron 1 cm to the left on one long edge
- Place this envelope on the kimono where the tip of the triangle ends at the navel. Sew the strip on the long side that has not been ironed along the cut-out right sides together. Shorten the strip to the correct length, then fold the end over to the left.
- Now sew the ironed-over edge of the strip on the right side with small stitches. The fabric of the kimono lies between the layers of the collar.
- Carefully overcast all sides of the garment. If you like, you can also sew on borders.
Fabrics for the garment
- For the vintage style to come out nicely, you should sew the kimono from a silk fabric that is printed with flowers or other Japanese motifs.
- If you are gifted, you can also take white silk, which you dye and paint accordingly. The garments look very nice when you finish sewing them and then immerse half of them in a dye bath. This creates a nice gradient.
How helpful do you find this article?