At Paint. NET use the stamp
The free image editing software Paint. NET allows you to edit your photos and images with just a few clicks. Among other things, you can use various standard tools such as the magic wand or stamp or use various filters. In addition, you can create and manage layers, which is a great advantage, especially when you are doing extensive image editing.

Paint's stamp tool. NET
With any good image editing program, you also have the freeware Paint. NET the ability to use the stamp tool.
- This is used to quickly and easily clone previously defined areas of the image to other areas, in other words, to put it simply, to paint over them with the selection.
- The great advantage of this function is that you can expand certain areas relatively quickly and easily without having to laboriously copy them and have relatively hard transitions. For example, if you have a beautiful building in the background that is covered by a branch, you could remove this branch by specifying the house facade as the image area to be cloned and then the branch paint over.
- The stamp works very easily. All you have to do is specify an exit point and then stamp over the desired positions. The selection adapts itself automatically, that is, once you have started cloning, the area that is to be cloned moves, automatically so that you don't always stamp the same point, but can basically duplicate entire objects without having to redefine the starting point have to.

With paint. NET clone certain areas
- To do this, first start Paint. NET and insert the picture you want to edit. You can easily get this from the Windows Drag Explorer into the program window or press Ctrl + O as usual or under "File" click on "Open".
- The best thing to do now is to duplicate your starting level so that you do not make the changes directly on it. This has the advantage that you do not change the basic level and you can quickly and easily switch the changes off or on. can be displayed. All you have to do is click the third button from the left at the bottom right next to "Layers", where you will see two overlapping layers. If you do not see this window, you would have to press the F7 key first.
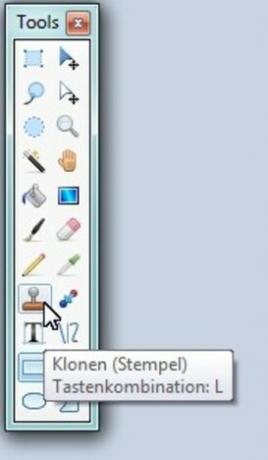
- Now call up the "Clone (Stamp)" tool, for which you have several options to choose from. First you could click in the toolbar ("Tools") in the left column on the fourth symbol from the bottom, which looks like a stamp. Alternatively, you could also press the "L" key or click the down arrow under "File" under "Tool" and then select the appropriate entry in the lower area.
- Next, you should set the pixel thickness, which is the diameter of the selection. You can do this in the upper area to the right of the "Tool" entry just mentioned in the "Pixel thickness" input field. You can either enter the desired value or use the buttons or the drop-down list.
- Now hold down the Ctrl key and use your left mouse button to define the starting point that is to be cloned. From now on, this will always be displayed to you.
- Now all you have to do is paint over the areas you want. To do this, you can either click once on the spot so that only the selected area is only stamped piece by piece, or you can paint over the desired area with the mouse button pressed.
- With Ctrl + S you can overwrite your changed picture or with Ctrl + Shift + S you can save a new picture file if necessary.
Paint. NET: Magic Wand Notes
Paint. NET is one of the free image editing programs. It's easy to ...

How helpful do you find this article?