How do you develop photos yourself?
Analog photography is particularly interesting if you develop the photos yourself. Explore how light and warmth can be used to change images afterwards. Test special effects that your digicam cannot achieve.
What you need:
- Darkroom equipment:
- Red lamp
- Heat source or hot water connection
- Developer tank with developer spool
- 1 ml-accurate measuring cup
- 1 500 ml measuring cup
- thermometer
- Film can opener / film retractor
- Film clips
- stopwatch
- scissors
- Felt pen
- 3 small plastic tubs
- 1 bowl
- Clothes line
- Clothespins
- Big tweezers
- Laboratory supplies:
- 2 developers (paper and film)
- Fixer
- Stop bath
- Distilled water
- Wetting agents
- 2 0.5l bottles, wide-mouth plastic bottles
- 2 canisters (to collect chemicals)
- Protective clothing:
- Smock
- safety goggles
- rubber gloves
How to set up the darkroom
You need a completely dark room to develop films because the films are sensitive to light. To begin with, you should limit yourself to black and white films. The chemicals needed are less of a problem and you can work in red light. With color films, you have to work in complete darkness.
- Find a room in the apartment that you can completely darken and where nobody will disturb you. Since the chemicals emit harmful vapors, adequate ventilation must also be possible in a darkened room. You will also need a sink with running water in the room.
- Arrange the room clearly. Remember that you have to find your way around in the dark or in poor lighting.
- Divide a shelf or shelf into sections: One section is for them Utils like measuring cups and can openers, one for the chemicals you need and one for waste. Set up a dry area slightly away to store photo paper and other things that shouldn't get wet. Also place the enlarger there.
- Try to have two work areas: You need one near the sink Area to store the spools and developer tank, as well as the chemicals that are in use are. Spaces for the bowls and a bowl are required to develop the photos. Also, use a line to dry films and photos.
Do you occasionally have any items for sale on the internet? Therefore …
Preparation of the chemicals
The chemicals needed are either liquids or powders. Be sure to follow the manufacturer's instructions on how to mix and use them. Please also read the safety instructions. You can see from this whether protective goggles are necessary.
- Label the bottles. You can use stop bath and fixer multiple times. Therefore, you will need the plastic bottles for these substances. How often you can use the chemicals is stated in the manufacturer's instructions.
- The canisters are intended for used developer and fixer. You must hand these substances in at a pollutant collection point. Label the canisters as you will need to store and dispense chemicals separately.
- Put on your smock and gloves to mix. Wear protective glasses if necessary. You can work in the light. The chemicals are usually corrosive and discolour your skin and clothing.
- Mix the stop bath and fixer exactly as directed and pour the mixtures into the prepared bottles.
How to Develop Films
The film is light-sensitive and usually well protected from light in a film can. Work in red light or in the dark. Otherwise the film will be destroyed.
- Open the film can and thread the film onto the developer spool. This is shaped like a spiral. The footage will not touch if you rewind it correctly. Put the can in the developer tank. Note: You usually have to cut straight off the beginning of the film in order to wind the film.
- Put on protective clothing and mix the developer as directed. Work at the sink and keep the canister close at hand to dispose of developer and fixer. It is essential that you adhere to the specified temperatures and quantities.
- Pour the developer into the tank. You must now close it tightly. Start the stopwatch. The exact development time depends on the film used and the developer. It is in the tables that you get from the developer.
- You can now work with the light on, the tanks are light-tight. Keep turning the tank upside down and back again for 30 seconds. After that, it is sufficient to turn the tank upside down three times every 30 seconds and then turn it back down. You distribute the chemical by tilting it and loosen any air bubbles from the film.
- After the development time has expired, pour the developer into the canister provided and fill the stop bath into the tank. Let it sit for 60 seconds before pouring it back into the bottle. Don't forget to mark the use on the bottle.
- Now the fixer goes into the tank. Pour a little of it into one of the measuring cups and place the cut-off beginning of the film into it. The end of the film changes in the bathroom and becomes clear. Stop the required clearing time. The film in the tank has to be fixed twice as long. Also when fixing, tip the tank upside down three times every 30 seconds.
- You are almost done now. Pour the fixer back into the bottle and keep adding fresh water to the developer tank. How to rinse the chemicals off. In the final rinse, add a little wetting agent and let the film hang dry. The agent causes the water to run off quickly and evenly.
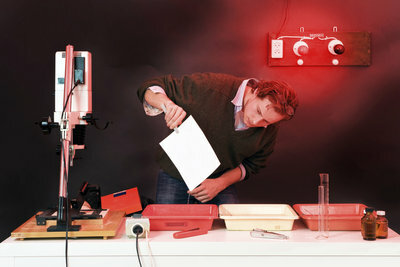
Make enlargements and achieve effects
- Fill a small tub about two inches high with developer for photo paper. Put stop bath in the next tub and fixer in the third.
- Work at red light. Place the selected negative in the enlarger and project the image onto the photo paper. The device works similarly to a projector.
- Put the exposed paper in the tub with developer. You can watch the picture develop. Changes to the image are possible in this phase. Experiment with heat or a small lamp that you turn on briefly.
- Place the photo in the stop bath for one minute and fix it in the fixer bath for the same time.
- Now you can turn on the light and look closely at the picture. Soak it thoroughly in the bowl of water before hanging it up to dry.
Now you know how to develop movies and enlarge photos. The hobby is interesting. Changing the images during development is particularly exciting.
How helpful do you find this article?