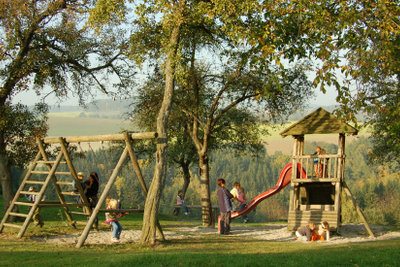
Build a wooden slide for children yourself
Mom i want a pony Dad, I want a tree house. I want a swing. I want a swimming pool. I want a seesaw. I want a slide... Yes, when the little ones want something, it is often difficult to simply refuse them. And because it gets really expensive to just always buy everything that is demanded, many put it Parents lend a hand and try their hand at one or the other play equipment - including this one Slide. You can find out how you can easily get to a wooden slide here.
What you need:
- Earth
- 3 thick 70 cm wide boards
- Chipboard
- 2 wide solid wooden boards
- 4 cross boards
- 2 bars approx 80 x 80 mm
- approx 40 mm thick wooden poles
- Screws
- glue
- concrete
- Belt sander
- Handsaw
- Forstner bit
Instructions for building a wooden slide
- First of all, you should choose a hillside location in the garden where you want to mount the slide. Ultimately, of course, it is just as possible to simply fill a slope if your property is not naturally blessed with a suitable hill. Depending on how steep the slope is and how high you heap up, you will later have to adjust the length of the board and the curve of the slide bars accordingly.
- Now prepare everything for the slide on the slope by digging an approx. 80 cm wide channel with the desired slide slope. Finally, you should shape the channel to be semicircular, and you can also fill it with concrete or paving it in order to give the wooden slide construction that is to be used later even more support.
- For the basic construction of the wooden slide, first of all get three strong boards and a fully coated chipboard. Wide solid wood boards with rounded edges are particularly suitable for the sides and thus securing the slide.
- The slide bars should now be rounded off in a radius of 80 cm. If you do not trust yourself to round it off, just ask at the hardware store next door - they will surely help you and possibly even give you individual tips if you can give you the desired slide height and the given slope describe.
- Finally, place the sliding surface and with it the chipboard and screw them tightly to at least four cross boards. In the places where you do not attach any cross braces, attach the sliding surface additionally with 4 x 40 mm screws.
- Then it goes to the ladder of the wooden slide. Its basic structure can easily be made up of two strong beams with the dimensions of approx. Build 80 x 80 mm by drilling about 30 mm deep holes for rung bars in the wood at intervals of about 20 centimeters with the Forstner bit. Make sure that the rung rod is strong enough at the end - it should be at least 40 mm thick. Finally, you should glue the individual rungs generously into the holes. It is best to also knock the rungs into the cheeks and tighten them with 5 x 50 mm screws, because glue alone will loosen very quickly after the effects of the weather.
- Finally, position the slide on the highest point of the heaped slope where you should embed it in concrete. The foot of the slide must also be concreted in so that the construction does not tip over in the end. Then fasten the ladder to the slope with wooden angles between the protruding slide bars by attaching 4 x 40 mm screws. The foot of the ladder should also be embedded in the ground with concrete in order to provide double stability.
- All protruding parts of the slide can now be removed with the handsaw, with any Edges or sharp corners should be rounded off with a belt sander to avoid risk of injury to exclude.
Unless you are a little familiar with working with wood, it is relatively ...
Once that is done, nothing stands in the way of happy sliding. As soon as the concrete has dried, your children and maybe even you will be able to enjoy the sliding fun in your own garden.
How helpful do you find this article?