Build a shelter from wood
Whether as a shelter, as a covered seating area in the garden or for storage: a wooden shelter has many uses. The decision to do so is therefore made quickly. But what do you actually have to consider? So that your shelter is secure and lasts for a long time, you should definitely plan the construction carefully.
What you need:
- Post anchor for floor mounting
- Precast concrete
- Base post (lower for rear)
- short crossbars (gaps)
- long crossbeams (roof connection)
- Roof beams
- thin cross bars
- Angle and flat iron
- (Stainless steel) screws, machine screws + nuts
- OSB panels, roofing felt / bricks / plexiglass corrugated sheets
- Possibly. Roof nails
- Wooden boards for cladding (e.g. B. Spruce)
- Weatherproof varnish
Before building the shelter
Before you start shopping for material and getting started, you should consider several things:
- Where should your shelter be and can you build a shelter there? Also pay attention to the distances to neighboring properties etc.
- Even a self-made shelter can be quite expensive if you have to buy all of the material from scratch. First make a plan, then a material list and then compare prices.
- Adjust the size of the shelter according to its purpose. If it is only a place to store bicycles, a small area and low height are sufficient. The posts and roof beams can also be correspondingly narrower.
- Do it all woodthat you use, beforehand with a weatherproof varnish. So your shelter will last longer.
Build a shelter for firewood yourself - this is how it works
As probably most people know, wet burning causes ...
Basic structure for the shelter
- Once you have selected a place for the shelter, first measure the location and mark the corner points of the shelter. Use cords for tensioning or a laser measuring device to keep everything straight.
- Depending on the size, you now set the appropriate number of base posts (depending on the thickness approx. 1-2m distance). To do this, you dig holes and concrete so-called post anchors (H-shape). Always check several times with the help of a spirit level that everything is straight.
- The posts at the back of the shelter should be lower than those at the front. This creates a slightly sloping roof and the rainwater can run off better.
- After the concrete has hardened, a small spacer is placed between the post anchor and the base post so that the posts do not rest directly and draw moisture.
- Machine screws are suitable for fastening, which are driven completely through the anchor and post (pre-drill!) And which you fix with screw nuts (min. 2 fixations at as great a distance as possible).
- Now connect the base posts with cross beams in approx. 80-100cm height. They are fastened between the posts with the help of angle irons. Leave a recess for the entrance (e.g. B. on the side or in front, in the middle between the bars).
- Further crossbeams connect the base posts at the very top, at the level of the lower posts. They are also placed between the posts parallel to the lower beams and fastened with angle and flat iron. The front base posts should now protrude a little over the resulting frame.
- The front and rear base posts are now connected with crossbeams over the entire length of the shelter (put on and fix with angle and flat iron). That’s up to you later roof on.
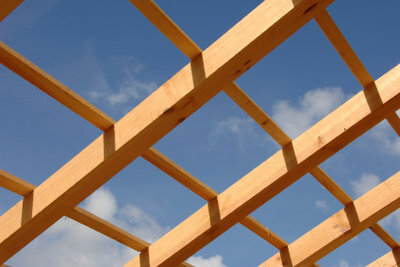
The roof structure for the shelter
- Roof beams are now placed over the entire length of the shelter. You should keep a distance of approx. 80-100cm (depending on size and thickness).
- The roof beams rest on the long crossbeams both at the front and at the back. Since the shelter is higher at the front, the roof beams must be notched so that they lie completely on top.
- The roof beams should be a little longer at the front and back so that the roof protrudes a little and it cannot rain in. Connect the roof beams to the substructure with the help of angle irons.
- The roof beams are connected again by small cross bars on which the roof is attached.
- As a roof, you can either screw OSB panels together and cover them with roofing felt, place translucent corrugated sheets made of Plexiglas or lay solid roof tiles. That’s entirely up to you.
- When everything is ready, you should add a gutter at the back with a collecting container for the rainwater.
The cladding for the shelter
- At least the back and one side wall (weather side) should always be closed. Take wooden boards that are wide enough to overlap. So it can't pull through the cracks so hard. Screws or nails are suitable for fastening.
- Fasten the boards from the outside to the lower and upper crossbeams. For the sides, between the beams and the roof, take longer and longer boards so that the slope is evened out. You can also omit this triangle and z. B. Insert plexiglass.
- It is up to you whether you leave the front of the shelter or a side wall open as an entrance. Likewise, you can only cover the side walls or the side areas of the front up to the lower crossbeams and leave the upper area free.
How helpful do you find this article?