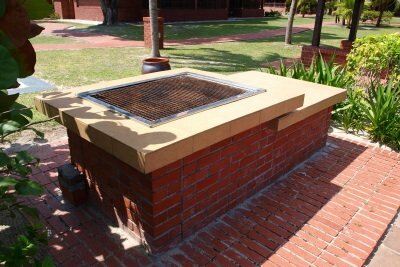
Build a grill with firebricks
What would summer be without a barbecue party? Hard to imagine, because who isn't eagerly waiting for the next barbecue season? If you start the grill more often, it is definitely worth building a grill yourself with firebricks.
What you need:
- 90 fireclay bricks (240mm x 110mm x 70 mm)
- Fireclay mortar (60 l)
- Masonry trowel
- Masonry hammer
- bucket
- Grill grate (400mm x 600mm)
- 4 steel tubes (diameter 16mm x 720mm)
- Spirit level
- Wood for support arch
- Roof battens for teaching
- angle
- gloves
- Supports for the grill grate
With a few tools you can build a grill. Fireclay bricks are refractory bricks that store a lot of heat. Fireclay bricks are therefore ideal for building a barbecue in the garden.
How to build a grill from firebricks
- First, find an ideal location. Since it is a fixed grill, the choice of location should be carefully considered. A level surface is best. In summer, only the sausages and steaks should sizzle on the grill and not you. Therefore, a shady spot in the summer would be recommended, which is also a little sheltered from the wind.
- These instructions are about a rather flat grill. Of course, the grill can be changed individually in width and height. All you need then is more stones, mortar and, if necessary, different grillage dimensions.
- A teaching aid serves as an aid - a frame made from wooden slats, which you can use as a guide for the construction of the wall.
- Make a frame out of wooden slats. The width of the frame represents the inside width of the grill, the height of the frame, the height of the grill. A crossbar is placed diagonally for reinforcement.
- Place the gauge on the surface on which the grill is to be built.
- Start with the first row of stones and place them in a U shape around the frame. The first row of stones is placed on a bed of mortar (refractory mortar / firebrick mortar).
- You start every second row of stones with half a stone. Use a masonry hammer to split the stones. Score the breaking point with the masonry hammer and divide the stone at the notch with a strong blow.
- Bring a total of 4 stone layers with a 1 cm bed joint each. Always check the alignment with the spirit level.
- You can also use a teaching arch to help you wall up the supporting arch. Place the teaching arch in the opening of the U-wall and build a round arch. When the mortar is set, you can simply remove the teaching arch again.
- Now another row of stones is being built, in whose mortar bed steel pipes are placed.
- So that the joint is not too thick because of the steel pipes, the pipes are pressed together on the contact surface with a screw clamp.
- Distribute the 4 steel pipes evenly and then start to wall an area of stones over them, on which you will later place the coal.
- Now you can build the walls of the grill higher. There are now 4 more rows of stones.
- Do not forget to install the brackets for the grillage in the horizontal joint.
- Finally, the joints are filled with mortar from the outside and excess mortar is removed so that a beautiful exposed masonry is created.
- Now all you have to do is place the grill grate on the holder and nothing stands in the way of the evening barbecue!
Bricked barbecue - this is how you design and build it yourself
People like to grill in summer. It's fun to invite family and friends and ...
How helpful do you find this article?