
Quilting instructions for beginners
Quilts are now common all over the world. Their characteristics include their rich colors and different types. There are different sewing techniques, all of which have a staunch following. A quilting guide for beginners shows the easiest way to sew a decorative quilt.
Special features of quilting instructions for beginners
- Quilts come in different patterns that require different sewing techniques.
- However, some of these sewing techniques are too complicated for beginners and - to prevent frustration - it is It makes more sense to follow instructions at the beginning that are simply based on the classic quilt oriented.
- As a rule, after your first quilt you will already have the hang of it and with a little practice you will be able to dare to work on other patterns and techniques. However, some of these sewing techniques are too complicated for beginners and - to prevent frustration - it is It makes more sense to follow instructions at the beginning that are simply based on the classic quilt oriented.
Beginner's Guide to a Colorful Quilt
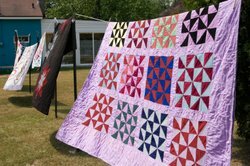
- A quilt usually consists of two or three layers. The top or top layer is the surface that is made up of individual, colorful patches. a single-colored panel on which to decoration Patches or other fabric elements are sewn.
- The underside usually consists of a single-colored panel of fabric.
- In the middle can - depending on the function - a warming layer made of fleece, cotton or other materials be sewn in.
- A simple beginner's quilt consists of a top of colorful, square patches of fabric that are sewn together. The underside is monochrome and consists of a slightly thicker fabric. This quilt is suitable for decoration as a bedspread or tapestry. Of course, you can also sew in a warming layer.
- First choose several fabrics that have different colors and patterns; the more different fabrics you have, the more colorful and varied your quilt will be. Make sure that the fabrics are roughly the same thickness.
- You should also choose a thicker material as the material for the underside, this material can also be colored or printed with a pattern.
- Now cut the fabrics for the top into squares of the same size and place them - depending on the desired shape - in front of you on a surface.
- Now - if you are satisfied with the pattern created from the patches - attach the individual pieces to one another with safety pins.
- Now you can sew them together. Use small, tight stitches so that the individual patches stick together well.
- Cut the fabric for the underside into a suitable size and then sew the underside and top together and you have sewn your first quilt!
Quilting Instructions for a Playmat
Are you looking for a present for your own child or that of the best ...
How helpful do you find this article?


