
Replace the radiator valve without draining the water
A radiator valve is a long-lasting component, but it can also lead to malfunctions if it has not been used for a long time. In such a case, the pressure pin, which is controlled by the thermostat and regulates the valve, becomes stuck. Most of the time, the only thing that helps is swapping. You do not have to drain the water to do this.
What you need:
- Tool for the shut-off valves
- 19mm open-ended wrench
- screwdriver
- Water pump pliers
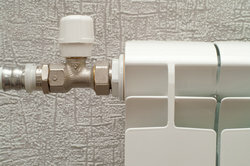
The radiator valve is under pressure
- You will notice it when venting, when the air is out, flowing violently water after. The entire heating system is under a prescribed pressure, which is necessary for trouble-free operation. Therefore, a radiator valve cannot be dismantled without shutting off the water pressure.
- For this purpose, every modern radiator has two valves at the connection to the supply lines, which are sometimes also covered. You can use a screwdriver or other tool such as a screwdriver. B. Allen wrench can be moved. Set the marking to "across" or screw in the insert as far as it will go.
Draining water doesn't have to be
- You have now neutralized the water pressure, you can release a small residual pressure by opening the vent. Then loosen the thermostat from the radiator valve with the screwdriver or the open-end wrench or the water pump pliers. The position should point to "5".
- You can now see the component to be replaced, it can be separated from the radiator (from the pipe and) using the open-ended spanner. When losing weight, it may be necessary to leak some water. If you are quick and put the new valve back on immediately, reduce the draining of even this small amount.
Prepare the exchange well
- So that you can replace the new radiator valve quickly, it must first be provided with a sealant. Some manufacturers prepare the thread with a rough milled cut. This ensures that the sealing tape or the hemp is not stripped off when it is screwed in.
- Wrap each seal on the thread equally tightly to the right so that the first 2-3 turns are still visible. If you have not applied enough, the area will remain leaky. If there is too much of a good thing, the valve cannot be turned in far enough. It should be hard to screw. without using force.
- After replacing, turn the supply lines on again to see whether the installation is also tight. Bleed the radiator again and finally mount the thermostat. You have successfully repaired your radiator.
Do-it-yourselfers can also easily replace a radiator. The connections have been ...
It should turn out that the internal thread on the radiator with sealant residue is very is dirty, you should refrain from replacing it quickly and thoroughly clean the thread beforehand scrape out. You may have to compensate for the loss of water by topping up the boiler. Old systems often have no shut-off valves, so draining can hardly be avoided there.
How helpful do you find this article?

