Folding ships with origami
Are you looking for creative play and handicraft ideas for school children? Why don't you try folding buoyant ships out of paper? Origami makes it possible and after the successful handicraft comes the fun.
What you need:
- square sheets of paper
- possibly a candle
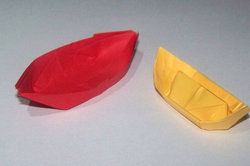
Both ships can swim. To prevent them from soaking up water so quickly, either use less absorbent paper or rub the arches for this origami-Work with some candle wax.
Simple ships made of paper
- On a square sheet, fold the opposite edges together and open the folds again.
- Fold one of the edges of the sheet to the center line and repeat this step with the opposite edge. The two edges meet in the middle of the sheet.
- Fold up all four corners so that half of the short sides are on the center line.
- For the next four folds, the fold lines run from the middle of the two long outer edges to one of the side tips. This works best if you mark these lines with the ruler and a not too pointed object. Fold the four corners up as well. You get a diamond-shaped figure.
- Fold the two blunt corners towards the middle.
- Open the work on the center line. If you push the bottom outwards a little, the figure is already in the shape of a boat. However, this becomes even more stable if you turn it over. To do this, carefully press the floor upwards, first in the places where the boat arches upwards, and then completely. If you've got the boat into shape, it's done.
Origami instructions for four simple models
Origami is a term used to describe handicrafts made from paper. There are very demanding and ...
An origami houseboat
- For a square piece of paper, fold one corner onto the opposite corner so that you get a triangle.
- Fold the two pointed corners together and open the fold again.
- Lay the work down so that the long edge of the triangle is facing you. Fold the left tip towards the midpoint of the bottom edge and open the fold again.
- Apply the work. Fold the point that is now on the left to the middle of the lower edge.
- Open this fold again and fold the point at the point on the lower edge where the fold of the other point meets. Open the fold again. Turn the job over and repeat these steps on the other side.
- Five vertical fold lines now run across the triangle. Fold the left corner vertically upwards at the second fold line from the left. Open this corner and press it down so that the folded-up edge is on the second fold line from the left. This creates a small square on this side. Turn the work over and do the same step on the other side.
- Fold the top corner down so that the fold line runs between the two side corners of the figure. Use only one layer for this. Open the fold again and bend the top corner down so that the left edge of the small triangle is against the top right edge of the square. Repeat these steps with the other layer on the back.
- On both the front and back, fold the top edge down to the center line. Fold the resulting strips together again lengthways.
- Fold these two narrow strips down again.
- Pull the figure apart a little at the opening and bend the strips, which have been folded over several times, upwards so that they form the edge of the boat. Start at the tips. Get the boat into shape a little.
As you can see in the photo, the two ships are different in size due to the different origami techniques, even though both were folded from the same sized note papers.
How helpful do you find this article?